Ultrasound Nerve Segmentation using Torchnet
We believe that deep learning has the ability to revolutionize healthcare. Read our post on deep learning in healthcare to understand where we are headed. Reaching this goal will require contributions from many people, both within and outside of Qure.ai. In this spirit, we want to open-source our work, wherever possible, so that the super-talented global deep learning community can build upon our solutions. In this post, we share our work on segmentation of nerves from the ultrasound images.
Kaggle ultrasound nerve segmentation challenge is one of the high profile challenges hosted on Kaggle. We have used U-net neural network architecture and torchnet package for tackling the challenge and achieved some remarkable results. The repository can be found here.
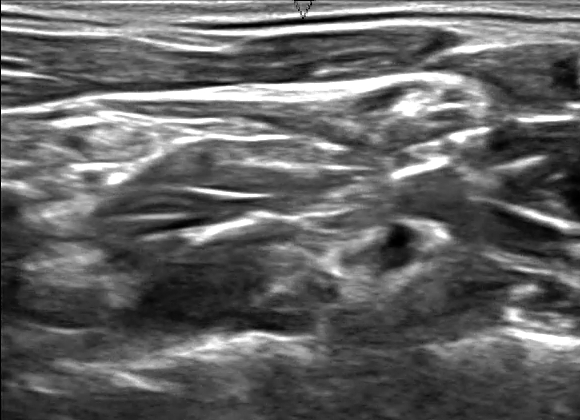
The challenge in itself is a great learning experience for segmentation problems. Figure below is an example of the image and the mask to predict.

Requirements
We assume following are installed in your system:
Cloning Repo
git clone https://github.com/qureai/ultrasound-nerve-segmentation-using-torchnet.git
cd ultrasound-nerve-segmentation-using-torchnet
Dataset Generation
The dataset consists of 5635 training images and their masks, and 5508 testing images. The images are in tiff format, and to be able to load them into lua, we convert then to png format. So firstly we need to setup dataset so that
- Train images are in
/path/to/train/data/images - Train masks are in
/path/to/train/data/masks - Test images are in
/path/to/test/data
Now, go to each folder and run the following command, it will generate .png file for each .tif file in the folder. Be patient the procedure takes time.
``` mogrify -format png *.tif
Now, we have all images in png format. To create datasets run the following command
th create_dataset.lua -train /path/to/train/data/images -trainOutput /path/to/train/data.h5 -test /path/to/test/data -testOutput /path/to/test/data.h5
This will package the dataset into HDF5 format, such that train images and masks of patient number `N` are in paths `/images_N` and `/masks_N` of the train HDF5 file respectively. The test images are in `/images` path of test HDF5 file generated.

## Model

We are using a slightly Modified [U-Net](https://arxiv.org/abs/1505.04597) with [Kaiming-He](https://arxiv.org/abs/1502.01852) initialization. The structure of U-Net generated using nngraph can be found [here](/assets/images/ultrasound_torchnet/U-Net.svg).
Source code to create this model is at `models/unet.lua`

<p align="center">
    <img src="/assets/images/ultrasound_torchnet/u-net-architecture.png" alt="U-Net Architecture">
    <br>
    <small> U-Net architecture </small>
</p>


## Training

You can start training right away by running

```bash
th main.lua [OPTIONS]
| Option | Default value | Description |
|---|---|---|
-dataset | data/train.h5 | Path to training dataset to be used |
-model | models/unet.lua | Path of the model to be used |
-trainSize | 100 | Amount of data to be used for training, -1 if complete train data to be used |
-valSize | 25 | Amount of data to be used for validation, -1 if complete validation to be used |
-trainBatchSize | 64 | Size of batch size to be used for training |
-valBatchSize | 32 | Size of batch size to be used for validation |
-savePath | data/saved_models | Path where models must be saved |
-optimMethod | sgd | Method to be used for training, can be sgd or adam |
-maxepoch | 250 | Maximum epochs for which training must be done |
-cvparam | 2 | Cross validation parameter |
Train Validation Data Split
The images are given for each patient, and thus in the dataset we have 47 patients with each patient having 119 or 120 images. To assess the real performance of our model, we divide the dataset into train and validation based on patients and use 80-20 split. Thus, now question arises which patients to use for validation and which for training.
To solve this, we keep a parameter -cvparam, such that all patients with patient_id%5==cvparam are used in validation, else in training. Now out of these images, we select -trainSize number of images and -valSize number of images for training and validation respectively. This allows us to do cross validation easily.
Data Augmentation
Data augmentation plays a vital role in any segmentation problem with limited dataset. Here we do on-the-fly data augmentation using modified Facebook’s resnet’s transformation file. The image goes through following transformations:
- Horizontal flip with probability 0.5
- Vertical flip with probability 0.5
- Rotation between -5 to 5 degrees with uniform probability
- Elastic transformations
Constants
We resize the image to imgWidth X imgHeight and then pass to our model. For creating segmentation masks, we consider a pixel from the output to be a part of mask if prob_pixel > baseSegmentationProb where prob_pixel is predicted probability that pixel is nerve. One can define these values in constants.lua file.
While your model is training, you can look into how torchnet was used to create the training pipeline.
Using Torchnet
Torchnet was introduced in second half of June to enable code re-use and to make writing code in Torch much more simple. It is basically a well structured implementation of the boilerplate code such as permutation for batches, training for loop and all such things, into a single library. In this project, we have used 4 major tools provided by torchnet
- Datasets
- Dataset Iterators
- Engine
- Meters
Datasets
Torchnet provides a abstract class tnt.Dataset and implementations of it to easily to easily concat, split, batch, resample etc. datasets. We use two of these implementations:
tnt.ListDataset: Given alistandload()closure, ith sample of dataset will be returned byload(list[i])tnt.ShuffleDataset: Given adatasetlike above, it creates a newDatasetby shuffling it.
For our model to generalize as it converges, providing a shuffled dataset on every epoch is an important strategy. So we load the data with tnt.ListDataset and then wrap it with tnt.ShuffleDataset:
local dataset = tnt.ShuffleDataset{
    dataset = tnt.ListDataset{
        list = torch.range(1,#images):long(),
        load = function(idx)
            return { input = images[idx], target = masks[idx] }
        end,
    },
    size = size
}
This ensures that whenever you query the dataset for ith sample using dataset:get(i), you get the image chosen at random from the dataset without replacement.

Illustration of dataset
Dataset Iterator
While, it is easy to iterate over datasets using dataset:get(i) and a for loop, we can easily do on the fly and threaded data augmentation using tnt.DatasetIterator
We call the iterator in every epoch, and it returns the batch over which training must be done. Before a batch is put for training, we must ensure that transformations for data augmentation take place and then batch is formed of the given size. Using shuffled dataset ensures that we get new order of data every epoch and thus batches are non-uniform across the epochs. tnt.BatchDataset ensures that batches are formed from underlying images.
return tnt.ParallelDatasetIterator{
  nthread = 1,
  transform = GetTransforms(mode), --transforms for data augmentation
  init = function()
     tnt = require 'torchnet'
  end,
  closure = function()
     return tnt.BatchDataset{
        batchsize = batchSize,
        dataset = ds
     }
  end
}
We use tnt.ParallelDatasetIterator with transforms, which ensures that when the training is going for batch n, it will apply transforms on batch n+1 in parallel and thus reducing the time for training.

Engine
From torch documentation,
In experimenting with different models and datasets, the underlying training procedure is often the same. The Engine module provides the boilerplate logic necessary for the training and testing of models. This might include conducting the interaction between model (nn.Module), tnt.DatasetIterators, nn.Criterions, and tnt.Meters.
Engine is the main running core that will put your model into train. We use optim engine which wraps the optimization functions of optim package of torch. Engine has hooks attached with different events of training. We can define a callback function and attach to the hooks, hooks ensure that these functions are called at the end of event it is attached to. We use these hooks to update our meters, save model and print the statistics of the training.
self.engine:train{
  network   = self.model,
  iterator  = getIterator('train',self.trainDataset,self.trainBatchSize),
  criterion = self.criterion,
  optimMethod = self.optimMethod,
  config = self.optimConfig,
  maxepoch = self.maxepoch
}
Below is an example of the hook that we attach to on end epoch event. We validate the model, print the meters and save model.
local onEndEpochHook = function(state)
  state.t = 0
  self:test()
  self:PrintMeters()
  self:saveModels(state)
end
state supplied to hook function stores the current information about the training process, such as number of epochs done, model, criterion, etc.
Meters
Again from torchnet’s documentation,
When training a model, you generally would like to measure how the model is performing. Specifically, you may want to measure the average processing time required per batch of data, the classification error or AUC of a classifier a validation set, or the precision@k of a retrieval model.
Meters provide a standardized way to measure a range of different measures, which makes it easy to measure a wide range of properties of your models.
We use tnt.AverageValueMeter for all parameters we want to observe such as validation dice scrore, validation loss, training loss, training dice score, etc. . They are set to zero on beginning of every epoch, updated at the end of an iteration in an epoch and printed at the end of every epoch.
Submission
th generate_submission.lua [OPTIONS]
| Option | Default value | Description |
|---|---|---|
-dataset | data/test.h5 | Path to dataset to be used |
-model | models/unet.t7 | Path of the model to be used |
-csv | submission.csv | Path of the csv to be generated |
-testSize | 5508 | Number of images to be used for generating test data, must be < 5508 |
Results
The model takes about 3 min for each epoch on a Titan X GPU. Using adam for training we received score greater than 0.620 on the leaderboard while using SGD takes it to greater than 0.628. It takes about 7 min to generate the submission file. Rock On!!
Let us know if this was helpful and feel free to reach out to us through the forum.